Introduction
Most people start researching how to start an indoor playground business for one reason: the business looks stable. Kids need to move. Parents need a clean, safe, weather-proof place.
That part is true. But the path from idea to profitable park is longer and messier than most investors expect.
After helping hundreds of playground projects across 30+ countries, I’ve seen the same two problems again and again. Owners build the budget around the equipment quote only, then get surprised by import duties, freight, and installation. Or they try to fill every inch of the floor plan because rent is expensive, then discover the finished playground feels crowded, hard to supervise, and uncomfortable for families.
If you’re researching how to start an indoor playground business, this guide gives you the real blueprint — not the sales pitch.
Phase 1: The Building, Space, and Sourcing
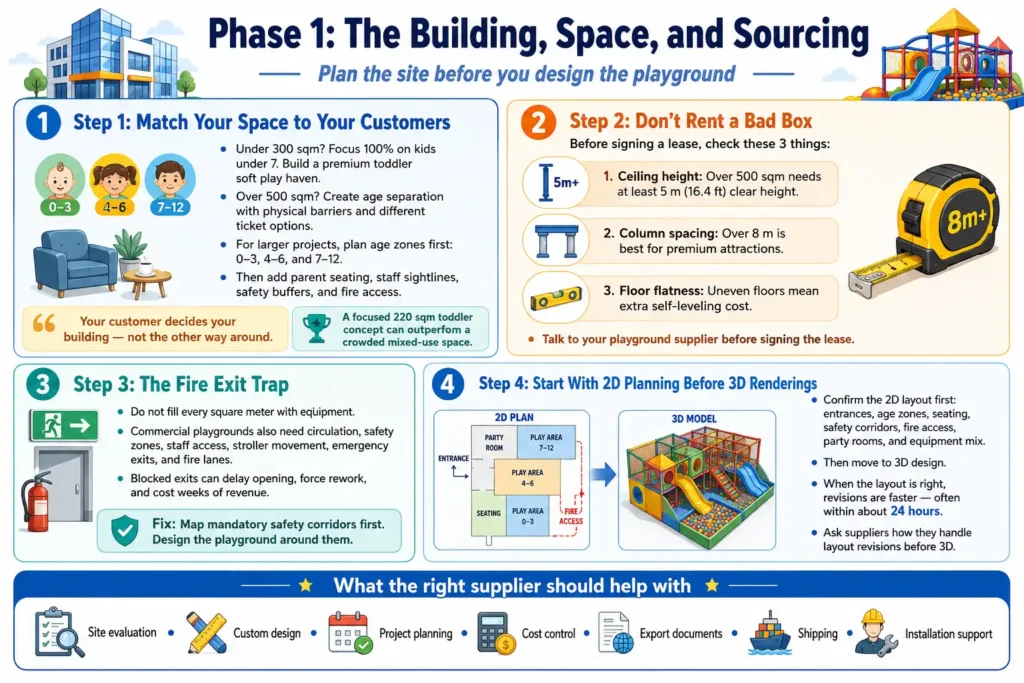
Step 1: Match Your Space to Your Customers
I see this mistake constantly. Someone rents a 250 sqm room and tries to add a ninja course, trampolines, a toddler zone, party rooms, and a cafe. On a 3D rendering, it may still look possible. In real life, families feel the crowding immediately.
Here’s the rule:
- Under 300 sqm? Focus 100% on kids under 7. Build a premium toddler soft play haven. One of my clients did exactly this — a hyper-safe, beautifully themed 220 sqm space. It prints money because they knew their limits.
- Over 500 sqm? Now you have room for age separation. Physical barriers between the trampoline zone and the crawling area. Different ticket prices for different age groups.
Your customer decides your building. Not the other way around. If the space is larger, do not just add more equipment. First define the age groups. For many full indoor playground projects, we separate the plan into 0-3, 4-6, and 7-12 age zones, then add parent seating, staff sightlines, safety buffers, and fire access.
Step 2: Don’t Rent a Bad Box
Cheap warehouses are cheap for a reason. If you can talk to your playground supplier before signing the lease, do it. We can often tell very quickly whether the building has enough clear height, whether the columns will damage the layout, and whether the usable space is much smaller than it looks on paper.
Before you sign anything, measure these three things:
- Ceiling height: Over 500 sqm? You need at least 5 meters (16.4 ft) of clear height. Less than that, and vertical slides, climbing towers, and multi-level structures lose their impact.
- Column spacing: Pillars are the enemy of good layout. If you want premium attractions like devil slides or large trampoline courts, you need column spacing over 8 meters.
- Floor flatness: Uneven floors mean expensive self-leveling work before installation even starts. Budget for it.
A site that looks acceptable to a landlord may still be difficult for an indoor playground. The earlier you check, the cheaper the mistake is.
Step 3: The Fire Exit Trap
This one kills projects.
You finish installation. Opening day is next week. Then the city inspector shuts you down because fire exits are blocked.
I see this happen when investors hire suppliers with too little project experience. They fill every square meter with equipment because it looks impressive on the proposal. But a commercial playground also needs circulation, safety zones, staff access, stroller movement, emergency exits, and fire lanes. Without those, you delay opening, tear down sections, rebuild walkways, and lose weeks of revenue.
The fix is simple. Map out mandatory safety corridors first. Design the playground around them. Not the other way around. If you’re still evaluating buildings, check our guide on ceiling height and space requirements before you commit.
Step 4: Start With 2D Planning Before 3D Renderings
Many investors want to jump straight to a 3D rendering because it feels more real. I understand that. You can see the colors, the theme, the slides, and the overall mood immediately.
But for a custom indoor playground, big decisions should happen in 2D first. The 2D plan is where we discuss entrances, age zones, parent seating, safety corridors, fire access, party rooms, and whether the equipment mix actually fits the business model. If a major change happens after the full 3D rendering is finished, every revision takes longer and the planning momentum disappears.
Our usual process is simple: confirm the 2D layout first, then move into 3D. Once the layout is right, later changes are usually smaller, and we can often adjust them within about 24 hours. When you evaluate indoor playground equipment, ask the supplier how they handle layout revisions before 3D design. That answer tells you a lot about their real project experience.
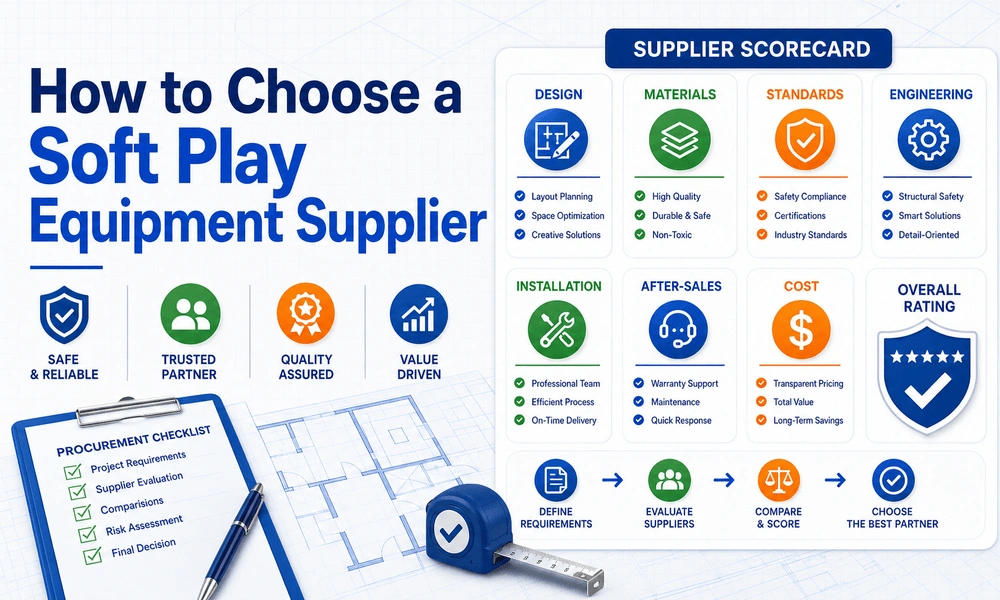
The right supplier should help with more than production. They should understand site evaluation, custom design, project planning, cost control, export documents, shipping, and installation support.
Phase 2: The Math (Budget & Operations)
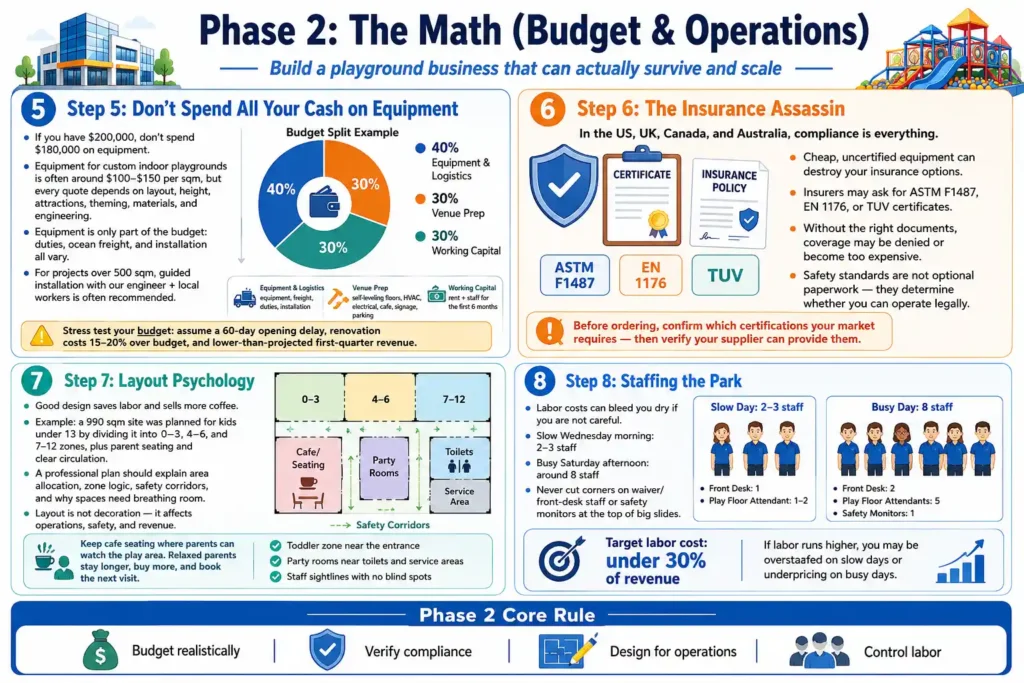
Step 5: Don’t Spend All Your Cash on Equipment
If you have $200,000, do not spend $180,000 on equipment. The playground will look impressive, but the business will be underfunded.
For many custom indoor playground projects, the equipment price is often around $100-$150 per square meter. But that is only a realistic range, not a fixed menu price. Every layout is customized. Area, height, attraction mix, theming, material choice, and engineering details all change the final quote, so our quotation team calculates each project based on the actual design.
More importantly, equipment is not the full budget. Import duties vary by country. Ocean freight changes by route and season. Installation cost depends on project size and whether you use only local workers or bring in our engineer with a local team. For projects over 500 sqm, we often recommend sending our engineer to guide the installation while the client hires local workers. The exact crew size depends on the project.
Here’s the split that works for my most successful clients:
- 40% Equipment & Logistics: The playground itself, ocean freight, duties, and installation.
- 30% Venue Prep: Self-leveling floors, HVAC upgrades, electrical work, cafe build-out, signage, and parking.
- 30% Working Capital: This pays rent and staff for the first 6 months while you build your customer base.
The stress-test version should assume opening is delayed by 60 days, renovation runs 15-20% over budget, and first-quarter revenue is lower than projected. If you can survive that scenario, your budget is realistic.
Step 6: The Insurance Assassin
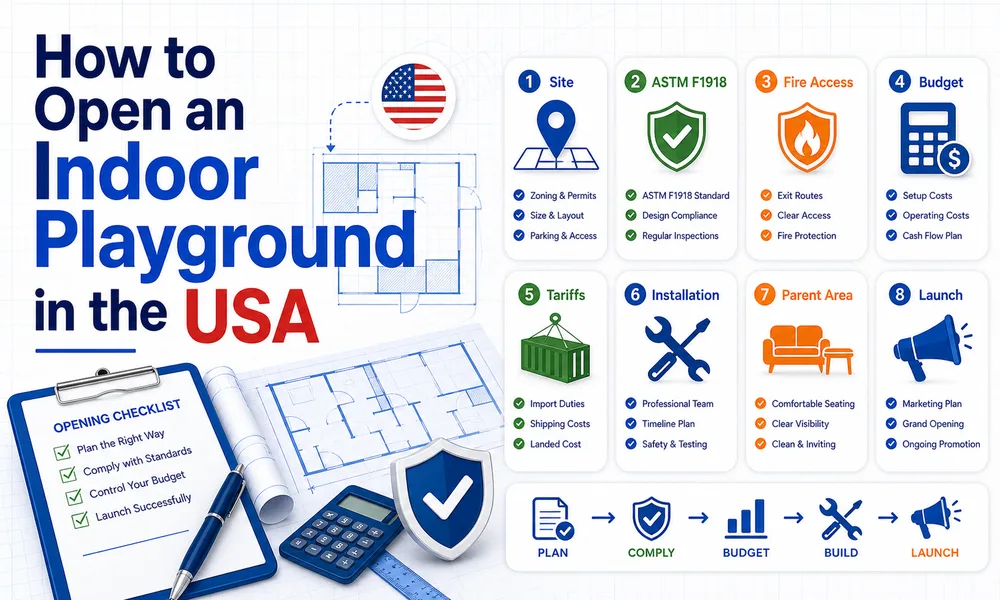
In the US, UK, Canada, and Australia, compliance is everything.
If you buy cheap, uncertified gear, here’s what happens: you try to buy liability insurance. The insurer asks for your ASTM F1487, EN 1176, or TUV certificates. You don’t have them. They deny coverage — or charge a premium that eats your margins.
Safety standards aren’t optional paperwork. They’re the difference between operating legally and not operating at all. Before you order anything, confirm which certifications your local market requires. Then verify your supplier can actually provide them.
Step 7: Layout Psychology
Good design saves labor and sells more coffee.
A US client once came to us with a 990 sqm site. His rent was high, so his first request was reasonable on the surface: please put in as many attractions as possible. We pushed back. First, we confirmed the target age range: under 13. Then we divided the venue into 0-3, 4-6, and 7-12 zones, plus parent seating and clear circulation.
I spent about a week preparing a detailed planning file with area allocation, zone logic, safety corridors, and the reason each space needed breathing room. The client changed his mind after seeing the data. That is what a professional custom plan should do. It should not just make the 3D image look full. It should make the future business work.
Never hide the cafe in a corner. Position the seating area where parents can see as much of the playground as possible. Moms want to drink a latte and watch their kids without standing up every 30 seconds.
When parents are relaxed, they stay for 3 hours instead of 1. They buy lunch. They book the next visit. A professional playground company should understand that layout is not decoration. It is operations, safety, and revenue.
Other layout principles: keep the toddler zone near the entrance (parents with strollers appreciate short walks). Place party rooms near toilets and service areas. Ensure staff sightlines cover every zone without blind spots.
Step 8: Staffing the Park
Labor costs can bleed you dry if you’re not careful.
On a slow Wednesday morning, you need 2-3 people: one at the desk, one cleaning and patrolling. On a packed Saturday afternoon? Bring in 8. Never cut corners on front-desk waiver staff or safety monitors at the top of big slides.
Here’s a number most owners miss: your labor cost should stay under 30% of revenue. If it’s higher, you’re either overstaffed on slow days or underpricing on busy days.
Phase 3: Launch and Build Local Demand
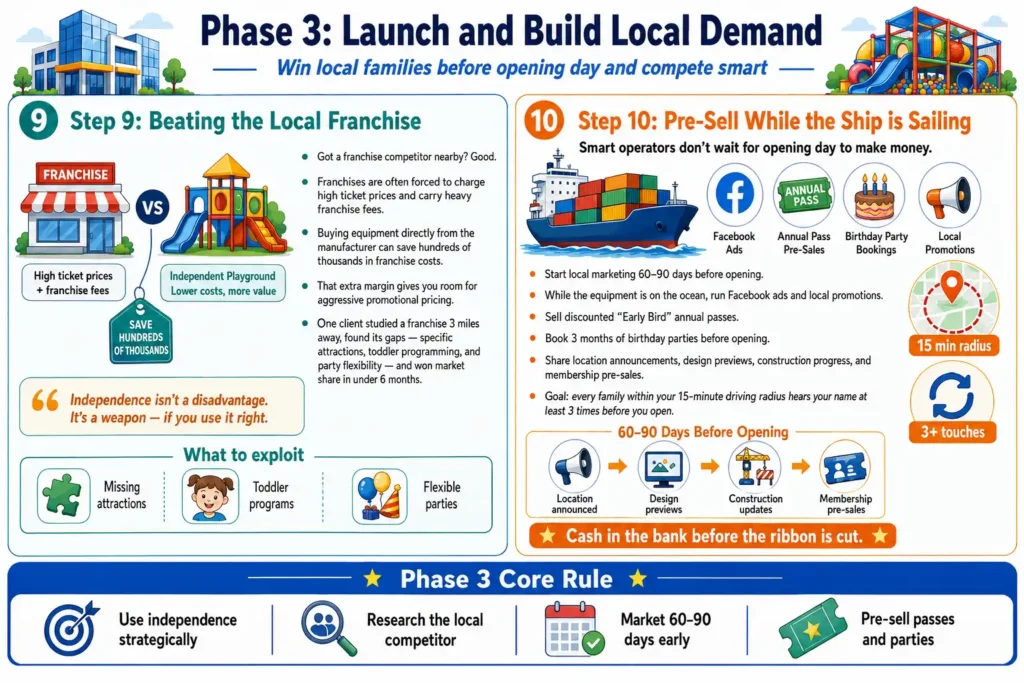
Step 9: Beating the Local Franchise
Got a franchise competitor nearby? Good.
Franchises are trapped. Corporate forces them to charge high ticket prices. When you buy equipment directly from the manufacturer, you save hundreds of thousands in franchise fees. That margin gives you room for aggressive promotional pricing.
One client faced a massive franchise park 3 miles away. We researched what the franchise lacked — specific attractions, toddler programming, party flexibility — and built those exact features into his park. He took their market share in under 6 months.
Independence isn’t a disadvantage. It’s a weapon — if you use it right.
Step 10: Pre-Sell While the Ship is Sailing
Smart operators don’t wait for opening day to make money.
While the equipment is sitting in a container on the ocean, they’re running Facebook ads, selling discounted “Early Bird” annual passes, and booking 3 months of birthday parties. Cash in the bank before the ribbon is cut.
Start local marketing 60-90 days before opening. Share location announcements, design previews, construction progress, and membership pre-sales. The goal: every family within your 15-minute driving radius hears your name at least 3 times before you open.
Common Mistakes to Avoid
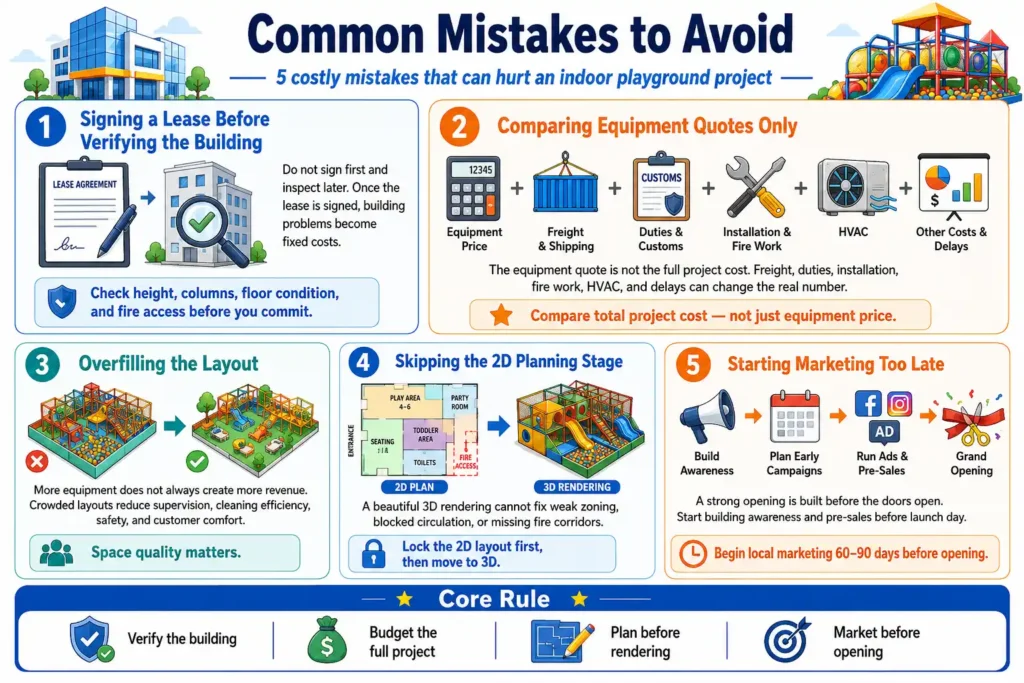
First, signing a lease before verifying the building. Once you sign, problems become fixed costs.
Second, comparing equipment quotes without comparing total project cost. Freight, duties, installation, fire work, HVAC, and delays change the real number.
Third, overfilling the layout. More equipment does not always mean more revenue. Crowded layouts hurt supervision, cleaning, safety, and comfort.
Fourth, skipping the 2D planning stage. A beautiful 3D rendering cannot fix weak zoning, blocked circulation, or missing fire corridors.
Fifth, starting marketing too late. A strong opening is built before the doors open.
FAQ
Q: How much does it cost to start an indoor playground business?
A: It depends on your city, venue size, renovation condition, equipment complexity, shipping, permits, and operating model. For many custom indoor playground projects, equipment is often around $100-$150 per sqm, but each design must be quoted separately. Always calculate total project cost, including duties, freight, installation, renovation, insurance, and operating cash. The biggest mistake is treating the equipment number as the whole budget. It is only one part of the investment, and usually not the only surprise cost later.
Q: Is an indoor playground business profitable?
A: It can be, but profit is not automatic. Revenue comes from admission, memberships, birthday parties, socks, food, events, and add-on services. The key drivers are rent-to-revenue ratio (keep it under 15-20%), labor efficiency, repeat visit rate, party bookings, and weekday traffic. A busy Saturday alone doesn’t guarantee healthy cash flow. The venues that struggle are usually the ones that underestimated how long it takes to build a loyal customer base, train staff, and create reasons for families to return.
Q: How long does it take to open an indoor playground from scratch?
A: From site selection to opening day, most projects take 4-8 months. The timeline includes market research, lease negotiation, 2D layout planning, 3D design, permits, renovation, equipment production, ocean shipping, installation, hiring, training, and pre-opening marketing. Delays usually come from fire approval, drawing revisions, construction issues, or late site handover. Always build a 30-day buffer into your schedule. If you confirm the 2D plan carefully before 3D rendering, later revisions are usually faster, cheaper, and less disruptive for everyone involved.
Q: Should I buy equipment locally or import from China?
A: Local suppliers may offer easier communication and faster service, while importing from China can provide stronger customization and cost advantages — often 30-50% savings on equipment. The right choice depends on budget, timeline, certification requirements, installation support, and total landed cost. Do not compare factory price against local installed price directly. Add duties, freight, customs clearance, and the installation plan first. If you’re comparing options, read our detailed guide on importing playground equipment from Chinabefore deciding with better confidence.
Q: What’s the biggest mistake first-time playground owners make?
A: Spending too much on equipment and leaving nothing for operations. A $300,000 playground with zero marketing budget and 2 months of cash reserve will struggle. The owners who succeed treat equipment as one piece of a larger investment — roughly 40% of total startup cost. The rest goes to venue prep, insurance, marketing, and enough working capital to survive the first 6 months while building a customer base. The playground doesn’t make money alone. The business around it does.